Django has a feature called inlines which can be used to edit multiple related objects at once. You’ll get a single view that will contain a single html form that includes a different Django form for each object, edit any of them and submit them all to be saved.
This feature is heavily used when you have objects that have a parent-child relation between them. For example, a book and a testimonial for each book. Each testimonial will belong to a single book and from a UX point of view it seems better to be able to edit all testimonials for each book at the same time.
The biggest disadvantage of inlines is that, because of how Django works, their interface is very primitive: For adding new objects, you need to define the number of empty forms that will be included for each inline. The user can fill them up and press save. Then the objects will be created and the user will get new empty forms to fill. To understand this better, let’s suppose that you have defined 3 empty forms (which is the default) and the user wants to create 10 inline objects. The flow will be:
- The user sees the 3 empty forms and fills them with data.
- The user presses save to POST the data.
- The user sees the 3 new objects and another 3 empty forms.
- The user fills the 3 empty forms with data.
- The user presses save to POST the data.
- The user sees the 6 new objects and another 3 empty forms.
- The user fills the 3 empty forms with data.
- The user presses save to POST the data.
- The user sees the 9 new objects and another 3 empty forms.
- The user fills 1 empty form with data.
- The user presses save to POST the data.
- The user sees the 10 new objects and another 3 empty forms.
As you can see the user is filling up the available forms and presses save all the time to get the new forms to display the objects. This makes the experience very problematic and confuses users that are not familiar with it. Also, when deleting objects, the user will see a delete checkbox for each object which needs to select and press save to actually delete the object. This is also counter-intuitive because it’s not easy for the user to understand that the object will be deleted when he saves the form.
In this article I’ll present a way to improve the experience of inlines: We’ll have a way to add new inlines without the need to save the form all the time. Also we’ll be able to improve the behavior of the delete button so it has a better UX.
The work in this article is published in this github repository: https://github.com/spapas/inlinesample.
The project implements a Book model containing multiple testimonials and editions. For each book you use inlines to add/edit the Book, its testimonials and editions in the same form. Also, I have included two ways to add/edit a book: Using the traditional django inlines way and using the javascript way I propose here.
Models
The models used in this project are the following:
from django.db import models


class Book(models.Model):
    title = models.CharField(max_length=256)
    author = models.CharField(max_length=256)


class Edition(models.Model):
    book = models.ForeignKey(Book, on_delete=models.CASCADE)
    publisher = models.CharField(max_length=256)
    year = models.IntegerField()
    pages = models.IntegerField()


class Testimonial(models.Model):
    book = models.ForeignKey(Book, on_delete=models.CASCADE)
    name = models.CharField(max_length=256)
    testimonial = models.TextField()
As you can see they are very simple; each edition and testimonial has a foreign key to a book.
Views
For the views I’m going to use the django-extra-views package that provides a bunch of useful inline-related Class Based Views:
from django.views.generic import ListView
from extra_views import (
    CreateWithInlinesView,
    UpdateWithInlinesView,
    InlineFormSetFactory,
)
from . import models


class BookListView(ListView):
    model = models.Book

    def get_queryset(self):
        return super().get_queryset().prefetch_related("edition_set", "testimonial_set")


class EditionInline(InlineFormSetFactory):
    model = models.Edition
    fields = ["publisher", "year", "pages"]
    factory_kwargs = {"extra": 1}


class TestimonialInline(InlineFormSetFactory):
    model = models.Testimonial
    fields = ["name", "testimonial"]
    factory_kwargs = {"extra": 1}


class BetterMixin:
    def get_template_names(self):
        if self.request.GET.get("better"):
            return ["books/book_better_form.html"]
        return super().get_template_names()

    def get_success_url(self):
        return "/"


class BookCreateView(BetterMixin, CreateWithInlinesView):
    model = models.Book
    inlines = [EditionInline, TestimonialInline]
    fields = ["title", "author"]


class BookUpdateView(BetterMixin, UpdateWithInlinesView):
    model = models.Book
    inlines = [EditionInline, TestimonialInline]
    fields = ["title", "author"]
As you can see for starts we add a BookListView that will be mapped to the / URL. This displays a table with all the books along with links to add a new or edit an existing book using both the traditional and better approach.
Then we define two classes inheriting from InlineFormSetFactory: EditionInline and TestimonialInline. These classes define our inlines: We set a model for them, the fields that will be displayed and pass extra parameters if needed. In this case we pass factory_kwargs = {"extra": 1} to have a single extra form for each inline. If we didn’t pass this Django would create 3 extra forms for each inline. Notice that if we were only using the better inlines we’d pass 0 to the extra parameter since it’s not really needed here. However because we use the same inlines for both the traditional and the better inlines I’m using 1 here (or else we wouldn’t be able to add new objects on the traditional approach).
Then we define a BetterMixin; the only thing it does it to return a different html template if the user visits the better views and override the get_sucess_url method to return to “/”. As you can understand from this, the only difference between the traditional and better approach is the template.
Finally, we’ve got two views for adding/editing a new book. We inherit from CreateWithInlinesView and UpdateWithInlinesView and set their model, inlines and fields attributes to the correct values.
Traditional templates
The traditional book_form.html template is like this:
{% extends "base.html" %}
{% load crispy_forms_tags %}
{% block html_title %}Book form{% endblock%}
{% block page_title %}Book form{% endblock%}

{% block content %}
    <form method='POST'>
        {% csrf_token %}
        <div class="card w-full bg-base-100 shadow-xl card-bordered card-compact border border-gray-900">
            <div class="card-body">
                <h2 class="card-title">Book</h2>
                {{ form|crispy }}
            </div>
        </div>

        {% include "partials/_inline_set_simple.html" with formset=inlines.0 title="Editions" %}
        {% include "partials/_inline_set_simple.html" with formset=inlines.1 title="Testimonials" %}

        <input type='submit' class='btn bg-blue-600' value='Save'>
        <a href='/' class='btn bg-gray-600'>Back</a>
    </form>
{% endblock %}
I’m using tailwind css for the templates. As you can see we get a two important context variables: form and inlines. The form is the main object form (book) and the inlines is the list of inlines (editions and testimonials). Notice that I’m using a partial template for each of the inlines to improve re-usability. The _inline_set_simple.html is like this:
{% load crispy_forms_tags %}

<div class="card w-full bg-base-100 shadow-xl card-bordered card-compact border border-gray-900">
  <div class="card-body">
    <h2 class="card-title">{{ title }}</h2>
    {{ formset.management_form }}
    {% for form in formset %}
      <div class='flex border rounded p-1 m-1'>
        {% for field in form %}
          <div class='flex-col mx-2 my-2'>
            {{ field|as_crispy_field }}
          </div>
        {% endfor %}
      </div>
    {% endfor %}
  </div>
</div>
This uses the django-crispy-forms package to improve form handling. See this article for a tutorial on using django-crispy-forms.
Notice that i’m doing formset=inlines[n], so each inline will have a management_form that is used internally by django and a bunch of forms (1 for each object). Each form will have the fields we defined for that inline with the addition of the delete checkbox.
This is enough to get the basic function. The user will get the following form when adding a new book:
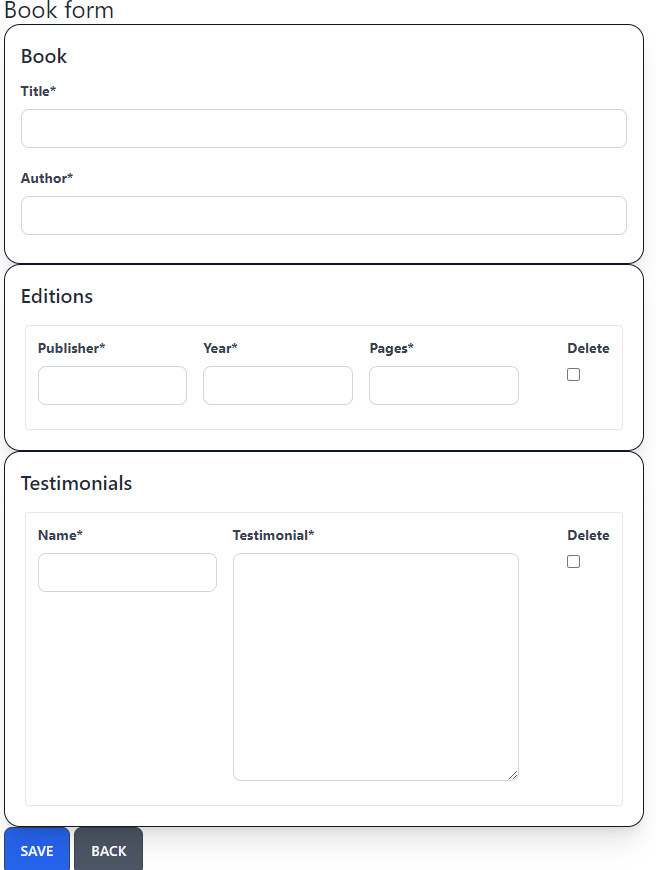
As we already discussed, the user fills the info and presses save if he wants to add more testimonials or editions.
Better templates
Let’s now take a peek at the book_better_form.html template:
{% extends "base.html" %}
{% load crispy_forms_tags static %}
{% block html_title %}Book better form{% endblock%}
{% block page_title %}Book better form{% endblock%}

{% block content %}
    <form method='POST'>
        {% csrf_token %}
        <div class="card w-full bg-base-100 shadow-xl card-bordered card-compact border border-gray-900">
            <div class="card-body">
                <h2 class="card-title">Book</h2>
                {{ form|crispy }}
            </div>
        </div>

        {% include "partials/_inline_set.html" with inline_name='edition_set' inline_title="Editions" formset=inlines.0 %}
        {% include "partials/_inline_set.html" with inline_name='testimonial_set' inline_title="Testimonials" formset=inlines.1 %}

        <input type='submit' class='btn bg-blue-600' value='Save'>
        <a href='/' class='btn bg-gray-600'>Back</a>
    </form>

<script src="{% static 'inline-editor.js' %}"></script>

{% endblock %}
This is similar to the book_form.html with the following differences:
- We include the partials/_inline_set.html partial template passing it the inline_name which is used to identify the inline. We also pass it the actual inline formset object and a title.
- We include some custom javascript called inline-editor.js that is used to handle the inline formset.
Notice here that we need to use the correct inline_name and not whatever we want! Usually it will be child_name_set but to be sure we can easily find it by taking a peek at the management form django will generate for us (we’ll see something like testimonial_set-TOTAL_FORMS, so we know that the name is testimonial_set).
The partial _inline_set.html is a little more complex:
<div id='better_inline_{{ inline_name }}' class="card w-full bg-base-100 shadow-xl card-bordered card-compact border border-gray-900">
    <div class="card-body">
        <h2 class="card-title">
            {{ inline_title }}
            <button class='btn btn-primary' type="button bg-blue-500" id="add-form-{{ inline_name }}">Add</button>
        </h2>
        {% if formset.non_form_errors %}
            <div class="alert alert-danger">{{ formset.non_form_errors }}</div>
        {% endif %}

        <template id="empty-form-{{ inline_name }}">
            <div class='flex border border-primary rounded p-1 m-1 inline-form'>
                {% for field in formset.empty_form %}
                    {% include "partials/_inline_field.html" %}
                {% endfor %}
            </div>
        </template>

        {{ formset.management_form }}

        {% for form in formset %}
            <div class='flex border rounded p-1 m-1 inline-form'>
                {% for field in form %}
                    {% include "partials/_inline_field.html" %}
                {% endfor %}
            </div>
        {% empty %}
            <div class='flex p-1 m-1 inline-form'></div>
        {% endfor %}
    </div> <!-- card body -->
</div><!-- card -->
We use the inline_name we passed to generate a unique id for this inline to reference it in the javascript. Then we have an add new form button. We also add an empty form template that we’ll use to copy over when adding a new form. The formset.empty_form is generated by django. After we include the management_form we enumerate the forms using a for loop. Notice the empty div <div class='flex p-1 m-1 inline-form'></div> when there are no forms, we need that to help us position the place of the forms to be added as will be explained later. The same inline-form class is used on the empty template and on the existing forms.
This uses the _inline_field.html partial template which is like this:
{% load widget_tweaks %}
{% load crispy_forms_tags %}

{% if field.field.widget.input_type == 'hidden' %}
    {{ field }}
{% else %}
    <div class='flex-col my-1 mx-2'>
        {% if "DELETE" in field.name  %}
            {{ field|add_class:""|attr:"onclick:delClick(this)"|as_crispy_field }}
        {% elif field.name == "testimonial" %}
            {{ field|attr:"rows:2"|as_crispy_field }}
        {% else %}
            {{ field|as_crispy_field }}
        {% endif %}
    </div>
{% endif %}
In this template we add an onclick function called delClick when the user clicks the delete checkbox. We could also do various other stuff like hide the delete checkbox and add a delete button instead but i’m leaving it as an exercise to the reader.
Better templates js
Let’s now take a peek at the actual javascript. First of all we define a function named inlinEditor:
function inlineEditor(inlineSetName) {
    let tmpl = document.querySelector('#empty-form-' + inlineSetName);
    let counter = document.querySelector('[name=' + inlineSetName + '-TOTAL_FORMS]')

    document.querySelector('#add-form-' + inlineSetName).addEventListener('click', ev => {
        ev.preventDefault()

        let newForm = tmpl.content.cloneNode(true);
        newForm.querySelectorAll('[id*=__prefix__]').forEach(el => {
            el.id = el.id.replace('__prefix__', counter.value);
            if (el.name) el.name = el.name.replace('__prefix__', counter.value);
        });

        newForm.querySelectorAll('[for*=__prefix__]').forEach(el => {
            el.htmlFor = el.htmlFor.replace('__prefix__', counter.value);
        })

        counter.value = 1 + Number(counter.value);
        let last_element_selector = 'form #better_inline_' + inlineSetName + ' .inline-form:last-of-type'
        document.querySelector(last_element_selector).insertAdjacentElement('afterend', newForm.children[0])
    })
}
This initially function saves the empty form template and the number of forms in the inline. The number of the forms initially is provided by the django management form. Then we add a click event to the add button for that particular inline. When the user clicks the add button we’ll add a new empty form to the end of the existing forms. This works like this:
Each of the inline forms has an id that has the following form inline_name-NUMBER-field_name, so for example for the first form of editions publisher we’ll get something like edition_set-0-publisher. The empty form has the string __prefix__ instead of the number so it will be edition_set-__prefix__-publisher. To create the new form we clone the empty form template and replace the __prefix__ on the elements with the correct number (based on the total number of forms). Then we increase the number of forms and insert the new form next to the element with the last_element_selector we define there. As you can see this selector will find the last element that is inside our inline and has a class of inline-form. That’s why we need the inline-form class to all three cases as we discussed above
Beyond this, we also have the implementation of delClick that adds a red-border class to form of the element that was clicked (notice the parentElement.parentElement thingie):
function delClick(el) {
    if(el.checked) {
        el.parentElement.parentElement.parentElement.classList.add('border-red-500')
    } else {
        el.parentElement.parentElement.parentElement.classList.remove('border-red-500')
    }
}
Finally, we generate the inlineEditors when the dom is loaded:
document.addEventListener('DOMContentLoaded', function(event) {
    inlineEditor('edition_set');
    inlineEditor('testimonial_set');
})
Please notice that here we also need to use the correct name of the inlines (both here and in the template).
Conclusion
Using the better approach our book form will be like this:
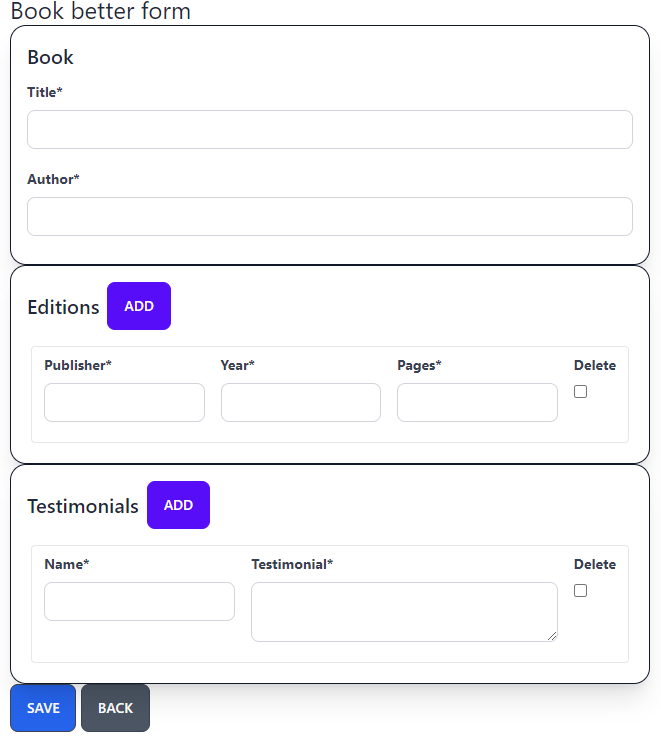
Now the user can click the add button and a new form will be added in the end of the current list of forms. Also when he clicks the delete button he’ll get a red border around the form to be deleted.
Before finishing this tutorial I’d like to point out some things that you need to be extra careful about, especially since you are probably going to use your own html structure:
- Don’t forget to use the correct name for the inlines in the partial template and when initializing it with inlineEditor
- Make sure to add the inline-form class to an empty div if there are no forms in the inline, to the existing forms of the inline and to the empty template
- Be careful on where you’ll add classes to the delClick handler; it depends on the structure of your html